최근 AI를 이용한 웹 서비스가 많아지고 있습니다.
보통 서비스 개발이라고 하면 프론트엔드와 백엔드 등 서비스에 필요한 모든 기능들을 직접 코드로 구현해서 배포하는 것을 먼저 생각하게 되는데, 이는 풀스택 개발자에게는 가능한 일이지만 사실 대부분 팀을 꾸려서 개발하는 것이 일반적입니다.
그래서 어떻게 하면 이런 웹 서비스를 누구나 쉽게 제작할 수 있을까 고민하다 워드프레스를 이용한 웹 서비스 개발을 생각하게 되었습니다.
워드프레스는 사용이 간편하면서도 강력한 확장성을 제공하기 때문에, 코딩 경험이 부족한 사람들도 비교적 쉽게 원하는 웹사이트를 구축할 수 있습니다. 특히 다양한 테마와 플러그인을 활용하면 복잡한 기능도 손쉽게 구현할 수 있다는 장점이 있습니다.
이 번 아티클을 시작하기 전에 사전 준비 사항이 있는데요, 워드프레스 설치와 OpenAI API Key를 발급 받으셔야 합니다. 이 부분은 검색을 통해서 쉽게 진행할 수 있는 부분이니까요 넘어가겠습니다 😏
WPCode 플러그인 설치 및 OpenAI API 호출 코드 작성
우선 필수 플러그인인 WPCode를 설치해야 합니다. 해당 플러그인은 코스 스니펫을 워드프레스 테마에 추가하고 삭제해주는 플러그인 인데요, OpenAI API를 호출해주는 코드를 저장해주는 역할을 합니다.
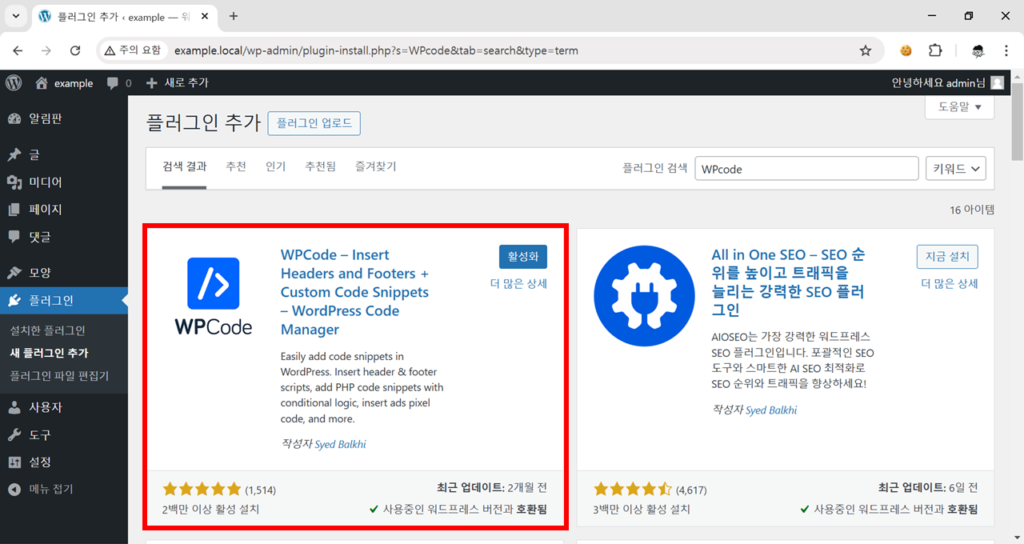
워드프레스 대시보드에서 플러그인 > 새 플러그인 추가로 이동한 뒤, WPCode를 입력해서 해당 플러그인을 설치 및 활성화를 해주세요.
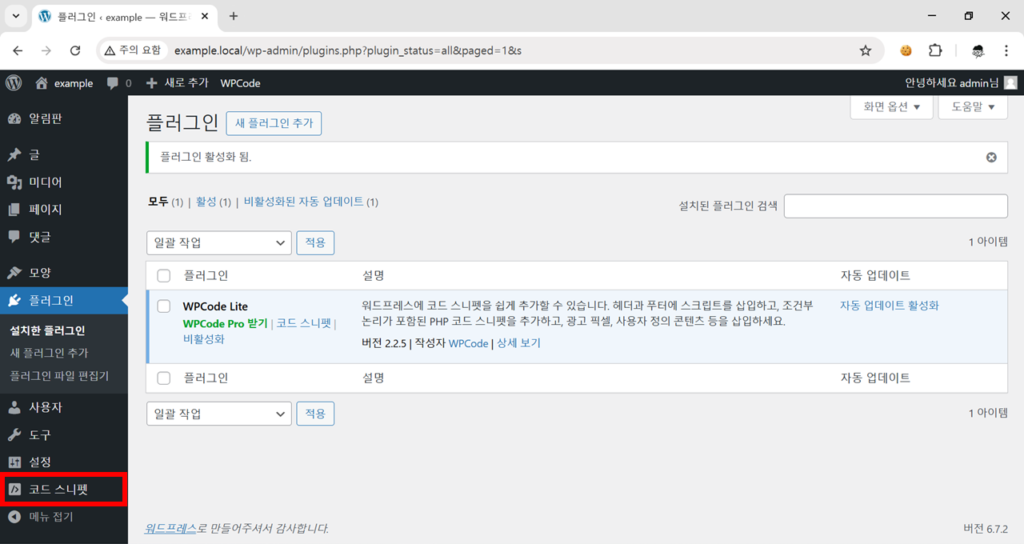
플러그인이 활성화 되었다면 아래 이미지처럼 좌측 대시보드 메뉴에서 코드 스니펫이 생성된 것을 확인할 수 있습니다.
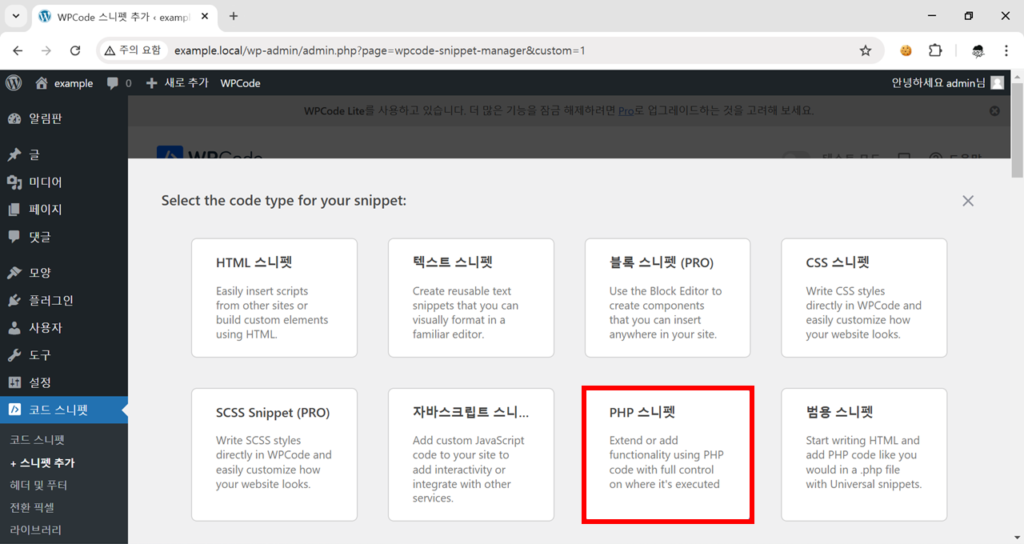
해당 경로로 들어가서 새로운 스니펫을 추가하면 아래 이미지처럼 코드 스니펫의 코드 타입을 설정하는 팝업이 나타나는데요, 여기서 반드시 PHP 스니펫을 선택해주세요.
다음으로 코드 스니펫의 제목을 입력하고, 코드 부분에 아래와 같은 코드를 입력해주세요.
function openai_generate_text() {

    $topic = isset($_POST['topic']) ? sanitize_text_field($_POST['topic']) : '';
    $prompt = "As an expert in writing a short storyline, your primary task is to generate a short story for the following topic: " . $topic . " in Korean.";
    // OpenAI API URL과 키
    $api_url = 'https://api.openai.com/v1/chat/completions';
    $api_key = 'sk-...';  // 실제 OpenAI API 키로 교체하세요.

    // OpenAI API를 위한 헤더
    $headers = [
        'Content-Type' => 'application/json',
        'Authorization' => 'Bearer ' . $api_key
    ];

    // OpenAI API를 위한 본문
    $body = [
        'model' => 'gpt-4o-mini',  // 모델 이름이 정확한지 확인하세요.
        'messages' => [
            [
                'role' => 'user',
                'content' => $prompt
            ]
        ],
        'temperature' => 0.7
    ];

    // WordPress HTTP API를 위한 인수
    $args = [
        'method'    => 'POST',
        'headers'   => $headers,
        'body'      => json_encode($body),
        'timeout'   => 120
    ];

    // 요청을 보냅니다.
    $response = wp_remote_request($api_url, $args);

    // 응답을 처리합니다.
    if (is_wp_error($response)) {
        $error_message = $response->get_error_message();
        wp_send_json_error("문제가 발생했습니다: $error_message");
    } else {
        $body = wp_remote_retrieve_body($response);
        $data = json_decode($body, true);

        if (json_last_error() !== JSON_ERROR_NONE) {
            wp_send_json_error('API 응답의 JSON이 유효하지 않습니다.');
        } elseif (!isset($data['choices'])) {
            wp_send_json_error('API 요청이 실패했습니다. 응답: ' . $body);
        } else {
            wp_send_json_success($data);
        }
    }

    // AJAX 콘텐츠를 에코하는 함수에서는 항상 종료합니다.
    wp_die();
}
add_action('wp_ajax_openai_generate_text', 'openai_generate_text');
add_action('wp_ajax_nopriv_openai_generate_text', 'openai_generate_text');
여기서 중요한 부분이 있습니다! 해당 코드에서 8번째 줄을 보면 OpenAI API Key를 입력하는 코드가 있는데요, 여기에 직접 발급 받은 API Key를 입력해주셔야 합니다!
$api_key = 'sk-...'; // 실제 OpenAI API 키로 교체하세요.
자 그럼 여기까지 백엔드 구현이 완료되었습니다 🎉 다음으로는 사용자에게 보여질 프론트엔드 페이지를 만들어 보겠습니다.
AI 도구 페이지 생성하기
다시 좌측의 대시보드 메뉴에서 페이지 > 새로운 페이지 추가를 해주세요.
저는 GeneratePress 테마를 사용중인데요, 어떤 테마든 어떤 페이지 빌더든 아무거나 사용해도 상관 없습니다 😉
아래 이미지처럼 HTML 코드 블록을 3개를 추가해주시고, 여기에 각각 HTML, CSS, JavaScript 코드를 입력해줄 것 입니다.
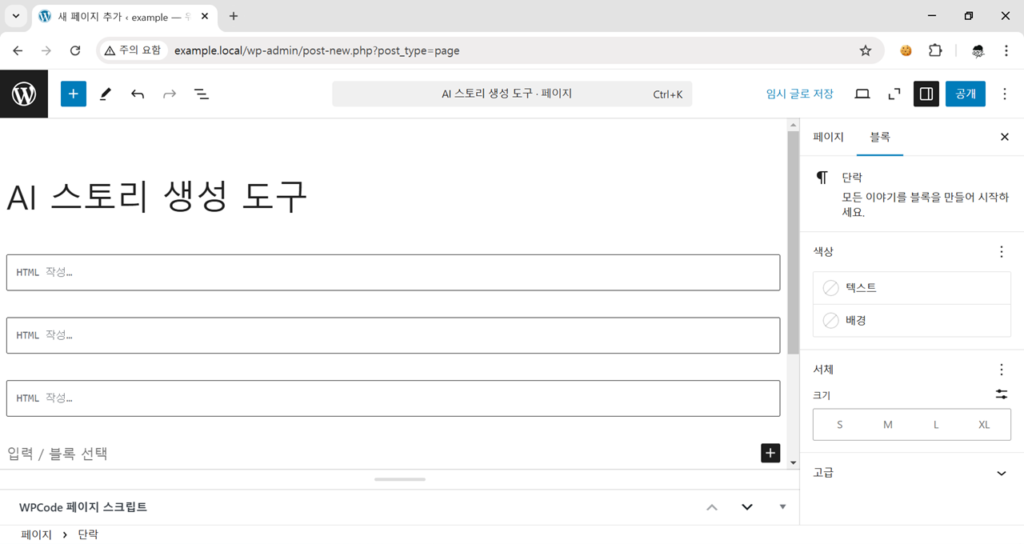
여기까지 따라오셨으면 아래의 HTML, CSS, JavaScript 코드를 각각 붙여넣어주세요!
HTML 코드 스니펫
<!DOCTYPE html>
<html lang="ko">
<head>
    <meta charset="UTF-8">
    <meta name="viewport" content="width=device-width, initial-scale=1.0">
    <title>AI 텍스트 생성 도구</title>
    <link href="https://cdnjs.cloudflare.com/ajax/libs/font-awesome/6.0.0/css/all.min.css" rel="stylesheet">
</head>
<body>
    <div class="container">
        <div class="card">
            <div class="tool-header">
                <h1>AI 스토리 생성 도구</h1>
                <p>원하는 주제를 입력하면 AI가 짧은 스토리를 생성해드립니다</p>
            </div>
            <div class="input-group">
                <input type="text" id="topic" placeholder="주제를 입력해주세요... (예: 인공지능의 미래)">
            </div>
            <button id="generate-button" class="button button-primary">
                <i class="fas fa-magic"></i>
                스토리 생성하기
            </button>
            <div class="loader" id="loading"></div>
            <div class="result-section" id="result-container">
                <div class="result-container">
                    <textarea id="result" readonly></textarea>
                    <button class="copy-button" id="copy-button" title="복사하기">
                        <i class="far fa-copy"></i>
                    </button>
                    <span class="copy-feedback">복사완료!</span>
                </div>
            </div>
        </div>
    </div>
</body>
</html>
CSS 코드 스니펫
<style>
:root {
    --primary-color: #4F46E5;
    --primary-hover: #4338CA;
    --background-color: #F9FAFB;
    --card-background: #FFFFFF;
    --text-color: #1F2937;
    --border-color: #E5E7EB;
}
* {
    margin: 0;
    padding: 0;
    box-sizing: border-box;
}
body {
    background-color: var(--background-color);
    color: var(--text-color);
    line-height: 1.5;
}
.container {
    max-width: 800px;
    margin: 2rem auto;
    padding: 0 1rem;
}
h1 {
    font-weight: bold;
}
.card {
    background: var(--card-background);
    border-radius: 1rem;
    box-shadow: 0 4px 6px -1px rgb(0 0 0 / 0.1);
    padding: 2rem;
}
.tool-header {
    text-align: center;
    margin-bottom: 2rem;
}
.tool-header h1 {
    font-size: 1.875rem;
    color: var(--primary-color);
    margin-bottom: 0.5rem;
}
.tool-header p {
    color: #6B7280;
}
.input-group {
    margin-bottom: 1.5rem;
}
#topic {
    width: 100%;
    padding: 0.75rem 1rem;
    border: 2px solid var(--border-color);
    border-radius: 0.5rem;
    font-size: 1rem;
    transition: all 0.3s ease;
    outline: none;
}
#topic:focus {
    border-color: var(--primary-color);
    box-shadow: 0 0 0 3px rgba(79, 70, 229, 0.1);
}
.button {
    display: inline-flex;
    align-items: center;
    justify-content: center;
    padding: 0.75rem 1.5rem;
    font-size: 1rem;
    font-weight: 500;
    border-radius: 0.5rem;
    border: none;
    cursor: pointer;
    transition: all 0.3s ease;
    gap: 0.5rem;
}
.button-primary {
    background-color: var(--primary-color);
    color: white;
    width: 100%;
}
.button-primary:hover {
    background-color: var(--primary-hover);
}
.button-primary:disabled {
    opacity: 0.7;
    cursor: not-allowed;
}
.result-section {
    margin-top: 2rem;
    display: none;
}
.result-container {
    position: relative;
    margin-bottom: 1rem;
    width: 100%;
}
#result {
    width: 100%;
    padding: 1rem;
    border: 2px solid var(--border-color);
    border-radius: 0.5rem;
    font-size: 1rem;
    line-height: 1.6;
    resize: none;
    background-color: #F8FAFC;
    overflow: hidden;
    min-height: 150px;
    transition: height 0.3s ease;
}
.copy-button {
    position: absolute;
    top: 0.5rem;
    right: 0.5rem;
    background-color: black;
    border: 1px solid var(--border-color);
    border-radius: 0.375rem;
    padding: 0.5rem;
    cursor: pointer;
    transition: all 0.2s ease;
}
.copy-button:hover {
    background-color: #333;
}
.copy-feedback {
    position: absolute;
    top: 0.5rem;
    right: 3rem;
    background-color: #10B981;
    color: white;
    padding: 0.25rem 0.75rem;
    border-radius: 0.375rem;
    font-size: 0.875rem;
    display: none;
}
.loader {
    display: none;
    width: 40px;
    height: 40px;
    margin: 2rem auto;
    border: 4px solid #f3f3f3;
    border-top: 4px solid var(--primary-color);
    border-radius: 50%;
    animation: spin 1s linear infinite;
}
@keyframes spin {
    0% { transform: rotate(0deg); }
    100% { transform: rotate(360deg); }
}
@media (max-width: 640px) {
    .container {
        margin: 1rem auto;
    }
    .card {
        padding: 1.5rem;
    }
    .tool-header h1 {
        font-size: 1.5rem;
    }
}
</style>
JavaScript 코드 스니펫
<script>
function autoResize(textarea) {
textarea.style.height = 'auto';
textarea.style.height = (textarea.scrollHeight) + 'px';
}
document.getElementById('result').addEventListener('input', function() {
autoResize(this);
});
window.addEventListener('resize', function() {
autoResize(document.getElementById('result'));
});
document.getElementById("generate-button").addEventListener("click", function(e) {
e.preventDefault();
var generateButton = document.getElementById("generate-button");
if (generateButton.disabled) return;
generateButton.disabled = true;
var topic = document.getElementById('topic').value;
var loading = document.getElementById('loading');
var result = document.getElementById('result');
var resultContainer = document.getElementById('result-container');
loading.style.display = 'block';
resultContainer.style.display = 'none';
var formData = new FormData();
formData.append('action', 'openai_generate_text');
formData.append('topic', topic);
fetch('/wp-admin/admin-ajax.php', {
method: 'POST',
body: formData
})
.then(response => response.json())
.then(data => {
loading.style.display = 'none';
if (data.success) {
result.value = data.data.choices[0].message.content;
resultContainer.style.display = 'block';
setTimeout(() => autoResize(result), 0);
} else {
result.value = '오류가 발생했습니다: ' + data.data;
resultContainer.style.display = 'block';
setTimeout(() => autoResize(result), 0);
}
generateButton.disabled = false;
})
.catch(error => {
loading.style.display = 'none';
result.value = '오류가 발생했습니다: ' + error.message;
resultContainer.style.display = 'block';
setTimeout(() => autoResize(result), 0);
generateButton.disabled = false;
});
});
document.getElementById("copy-button").addEventListener("click", function() {
var result = document.getElementById('result');
var copyFeedback = document.querySelector('.copy-feedback');
result.select();
document.execCommand('copy');
copyFeedback.style.display = 'block';
setTimeout(() => {
copyFeedback.style.display = 'none';
}, 2000);
});
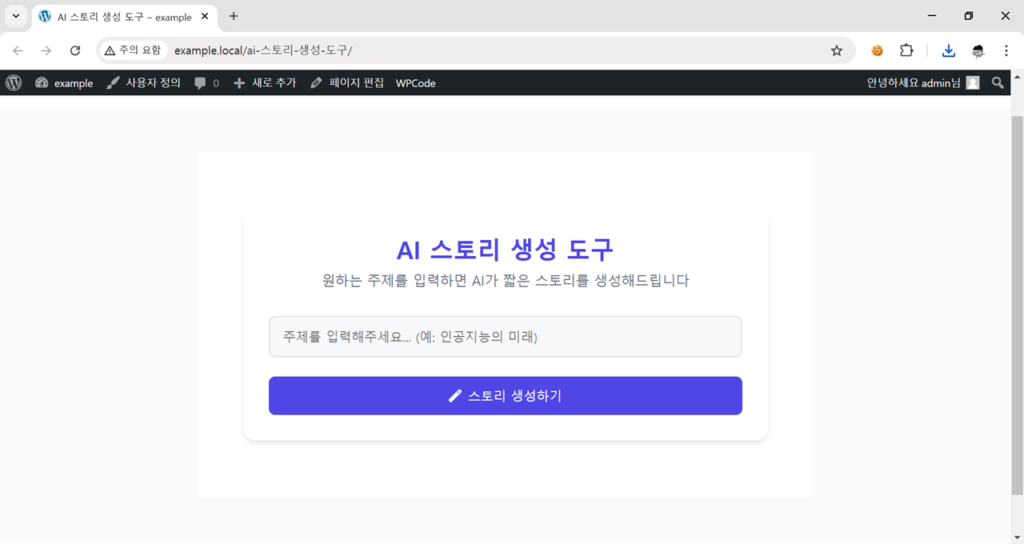
</script>다음 3개 코드를 전부 입력한 뒤 페이지를 저장해주시고 확인해보시면 아래처럼 AI 도구가 아주 잘 생성된 것을 확인하실 수 있습니다.
오늘 제작한 도구는 사용자가 입력한 주제로 짧은 스토리를 작성해주는 AI 도구입니다. 만약 ‘블로그 글 제목 작성 도구’나 ‘블로그 글 작성 도구’ 등 다른 AI 도구를 만들고 싶다면 어떻게 해야 할까요?
다시 아까 작성한 백엔드(PHP 코드)로 돌아가서 해당 코드 4번째 줄을 보면 아래처럼 프롬프트가 작성되어있습니다.
$prompt = "As an expert in writing a short storyline, your primary task is to generate a short story for the following topic: " . $topic . " in Korean.";
이 프롬프트는 사용자가 입력한 주제를 받아와서 프롬프트를 완성시켜 API 호출이 이루어지는 형태입니다. 이 부분을 수정하면 다양한 AI 도구를 제작할 수 있겠죠!
가령 파라미터를 추가해서 주제 뿐만 아니라 언어나, 말투 등을 입력 값으로 받아 더욱 정교한 AI 도구를 만들 수도 있을 것입니다.
이번 글에서 준비한 내용은 여기까지 입니다. 궁금한 사항은 댓글로 남겨주세요!
감사합니다 🙇♂️